Scripts updated for OmniFocus 3

OmniFocus 3 gave users a long-awaited feature: the ability to assign a task to multiple contexts. But the transition also came with a nomenclature change: the old contexts now became tags, a change that was reflected both in the UI and the underlying AppleScript dictionary.

Unfortunately, there wasn’t a graceful transition for scripts: OmniFocus 3 doesn’t know what a context is, so older scripts that referred to them needed to be updated to reflect the new world order.

Of course I’ve updated all the scripts that I use with OmniFocus on a daily basis – many of these updates were made when OmniFocus 3 was in beta early last year.

But after receiving a steady trickle of emails from people wondering how to fix some of my OmniFocus AppleScripts (the answer always being some variant of “search for context and replace it with tag), I came to the embarrassing realization that I never actually pushed the updates back to Github.

Sorry, everyone!

I took some time this weekend to update all my scripts on Github. Here’s what’s changed:

  • I took the opportunity to scrape out lots of unnecessary code related to Growl, since 100% of respondents to my Twitter survey (n=3) no longer use Growl. So the scripts are all leaner and cleaner.
  • A couple other minor changes, like cleaning up the text of notifications. For example, the Total Time script used to waste the script headline (“title”) telling you “Script complete”: Now the key information gets top billing:
  • And yes, the scripts are all updated for OmniFocus 3. (Still shaking my head that it took this long for me to notice.)

Paste email link from selected MailMate message(s)

David Sparks posted about a clever idea to instantly link to Apple Mail messages from anywhere:

I’ve always like the way OmniFocus can create links to Apple Mail messages when saving an email as a task…

I’ve now got a script that can do that anywhere via a text expander snippet…

Once you’ve installed it, just type “elink” in any app that can take a URL and you create a link to the currently selected email message. I use it all the time in Notes and Calendar note fields but it really works anywhere.

Here’s an adaptation that works with MailMate and Keyboard Maestro:

Get email link macro

MailMate doesn’t have a ton of AppleScript support, but there is built-in Copy Links to Messages bundle command, and you can execute bundle commands via AppleScript.1

So it was just a matter of stringing together

  1. A typed keystroke trigger (I’m using elink, Spark’s shortcut of choice)
  2. MailMate’s copy command
  3. Paste

For good measure, the final action restores the prior clipboard contents.

Download on the Keyboard Maestro forum


  1. This is why I used Keyboard Maestro instead of TextExpander: TextExpander needs scripts to return a specific value for typing, but the MailMate script is run indirectly, puts the url on the clipboard, and returns empty. With Keyboard Maestro, the next step (pasting the clipboard) is trivial.

Log ad hoc items into OmniFocus

OmniFocus provides my daily roadmap for where I’m going. But maps can be unreliable: sometimes an emergency requires a detour … and sometimes you just pause for an unscheduled cup of coffee or phone call with a friend.

To quickly log those unanticipated events in OmniFocus – without imposing additional overhead on the system – I invoke these simple scripts from LaunchBar:

  • Log completed item to OmniFocus (CC) – saves a completed task to my work-misc project
  • Log completed item to OmniFocus (Misc) – saves a completed task to my personal-misc project
  • Log distraction to OmniFocus – saves a completed task to my distractions project

When something comes up that I’d like to log:

log-distraction

  • ⌘ space to invoke LaunchBar
  • logcc, logmisc, or dist to choose the type of entry
  • space to start typing
  • [type what it was]
  • Enter to save

Now a completed task appears in the appropriate location, and my Completed Tasks perspective gives a more accurate representation of the day.

To use it, download the script and customize the project name and context to fit your needs. Should work with Alfred as well.

Log completed item to OmniFocus

Bless you, OmniFocus (or, How I Learned to Stop Fidgeting and Quickly Rename Multiple Versions of the same Application)

The upcoming OmniFocus 2 refresh provides more than ample reason for excitement. Forecast view? Updated review mode? The giddy feeling of firing up this morning’s sneaky-peek build to find yet another shiny new release ready for your eager paws? Check, check, check.

But unlike last time around1, OmniFocus 2 isn’t ready to take over my life yet, so for the moment I’m still usually working in OmniFocus 1. Every couple days I fire up OmniFocus 2 to kick the tires a little more and sometimes provide some (hopefully useful) feedback to the good folks at the Omni Group. (And yes, they’re listening.)

Unfortunately, switching fluidly between the two versions becomes problematic when you bring third party tools into the mix. Case in point: AppleScripts that tell application "OmniFocus" expect that they’re working with an application called OmniFocus. So if OmniFocus 1 is called “OmniFocus 1” and OmniFocus 2 is called “OmniFocus”, your scripts will always invoke OmniFocus 2 until you rename the applications – even if you’re currently working in OmniFocus 1. That’s hardly ideal if you’re switching version with any regularity. And it was keeping me from using OmniFocus 2.

The solution? A script, of course! Here’s a script that automates the process of switching between primary versions of OmniFocus. This is what it does:

  1. Checks your applications folder for items matching the name OmniFocus* and asks you which version you’d like to bless2 [See the end for a version that skips this]
  2. Renames the blessed version to “OmniFocus.app”, and the other versions to “OmniFocus [version].app”
  3. Launches the blessed version

Here it is in action:

Bless OmniFocus demo

For those who enjoy reading detailed notes:

  • If you choose the version that’s already blessed, that version will be activated and no renaming will occur.
  • If OmniFocus (or many OmniFoci) is running when a the script is ready to rename, the script will handle quitting and relaunching for you.
  • If you happen to have multiple copies that would have the same target name, only one will be renamed (i.e., files shouldn’t be randomly overwritten).
  • While I built this workflow for the purpose of OmniFocus testing, it could work just as easily with any other application: just change the application name at the beginning of the script. You can also change the applications folder.
  • If the script encounters an application without a version number in its metadata, it will be renamed according to its creation date.
  • If you use the tell application "System Events" to choose from list line, the dialog will appear at the front (rather than possibly being buried behind windows). However, in my experience, System Events can hang, so I endure the less convenient version in order to keep things running quickly.
  • …and of course, your user account needs to have the proper permissions to rename the files.

I’ve been using this for about a month without issue, but of course use at your own risk and please let me know if you have any issues.

Grab the script here:

p.s…

Michael Schechter wondered about a version that blesses a specific version, rather than prompting for user input. This could be useful if you want to…

  • Set up a Hazel rule or timed Keyboard Maestro action to automatically switch versions
  • Keep two versions of the script for each version of the app to trigger by a launcher

So if you’d prefer a “headless” version, try this one.


  1. OmniFocus 1 replaced Ethan Schoonover’s exceptionally clever but ultimately hackish OmniOutliner scripts, Kinkless GTD, so it wasn’t long before OmniFocus quickly surpassed kGTD’s utility. But OmniFocus 1 is now a very mature product, so it may be some time before OmniFocus 2 can fill its shoes.
  2. Blimey, why the blessing? The name comes from a system command to choose which operating system to run on startup. The OS that’s set to run is “blessed”, and you select it by running the bless command.

Minimize distractions with Keyboard Maestro

After Ryan Irelan posted about using Keyboard Maestro to block apps, I decided I could adapt the tip for a less cold-turkey approach to computer-enforced self control.

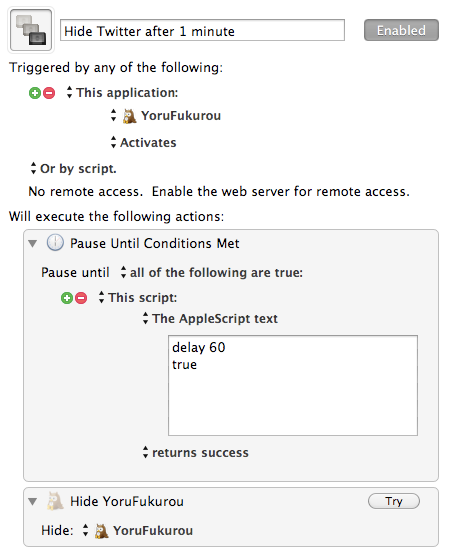
So I’ve been using Ryan’s tip with one minor change: it uses the world’s simplest AppleScript to introduce a time limit for how long distracting apps can remain open (or active). Just create a Keyboard Maestro macro like the following (or download this example):

Hide Twitter

As you can see, this macro waits one minute (60 seconds) before hiding my Twitter client. Works like a charm: hiding the app doesn’t force me to leave Twitter; but reactivating the app becomes a conscious act of will that forces me to answer That Question.

(I use a similar macro to quit my RSS reader after a more generous 10 minutes.)

AppleScript and Growl: a survey of possible solutions to the “Growl not installed” problem

10/31/11: Updated to work with Growl 1.3 (MAS version).

TL;DR: If you want to use Growl notifications in your AppleScripts without causing problems for people who don’t have it installed, feel free to use this code.

For anyone who writes AppleScripts that use Growl notifications, the problem is familiar: if a user doesn’t have Growl installed, the script throws a fit when they try to run it. Specifically, at load time, the AppleScript interpreter looks for all the applications listed in the script to retrieve their scripting dictionaries, and if it can’t find any of the listed applications, it asks the user where to find it:
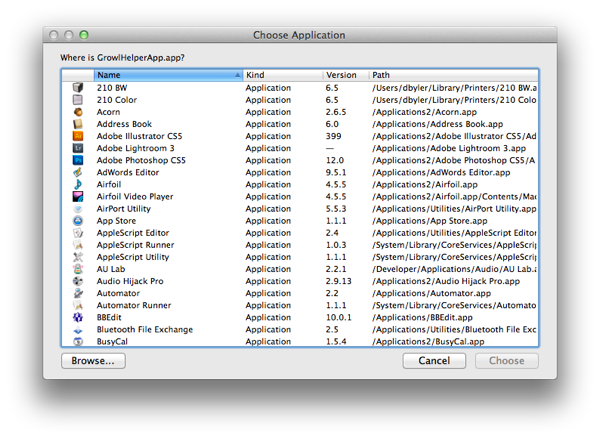
Where is GrowlHelperApp.png

This can be frustrating for users who don’t have Growl installed: either they don’t know what Growl is (and therefore have no idea what to do in this situation), or they actively prefer not to have Growl on their system. In neither case do you want to force users to install Growl.

Although others have written about this issue—including a couple solutions that work—I still spent a lot of time and frustration trying to work through the issue and thought it might be helpful to post a survey of different methods that don’t work—and why.

Method one (bad): Growl, straight-up

Pros: Elegant, simple, as Growl intended. Cons: Script chokes on Growl-free systems.

The simplest solution is to call Growl using the intended syntax, ignoring users who don’t have Growl installed. The code is straightforward and easy to understand:

[code lang=”AppleScript”] property growlAppName : “Dan’s Scripts” property allNotifications : {“General”, “Error”} property enabledNotifications : {“General”, “Error”} property iconApplication : “OmniFocus.app”

tell application “GrowlHelperApp” register as application growlAppName all notifications allNotifications default notifications enabledNotifications icon of application iconApplication notify with name “General” title “Note title” application name growlAppName description “Note description” end tell [/code]

But if the point of your script is to simplify a task, it’s not very helpful to publish something that won’t run for those who don’t happen to share your idea of a pleasant notification experience.

And you probably don’t want to maintain two versions of the same script.

Interlude: Detecting Growl

To support both Growl-enabled and Growl-free systems, you need to detect whether Growl is installed before deciding what to do. For that, best practice1 seems to be to first check whether Growl is running:

[code lang=”AppleScript”] tell application “System Events” to set GrowlRunning to (count of (every process where creator type is “GRRR”)) > 0 [/code]

Then, if Growl isn’t running, check if it’s installed, try to launch it if so2, and run the alternative notification if not:

[code lang=”AppleScript”] if not GrowlRunning then –if Growl isn’t running… set GrowlPath to “” –check to see if Growl is installed… try tell application “Finder” to tell (application file id “GRRR”) to set strGrowlPath to POSIX path of (its container as alias) & name end try if GrowlPath is not “” then –…try to launch if so… do shell script “open ” & strGrowlPath & ” > /dev/null 2>&1 &” delay 0.5 set GrowlRunning to my IsGrowlRunning() end if end if if GrowlRunning then NotifyWithGrowl(alertName, alertTitle, alertText, useSticky) else NotifyWithoutGrowl(alertText) end if [/code]

Method two (bad): string encapsulation

Pros: Used to work; doesn’t choke on Growl-free systems. Cons: No longer works with Growl.

For a long while I used a very simple method that encapsulated Growl statements in a string variable, which prevents the interpreter from choking on systems that don’t have Growl installed:

[code lang=”AppleScript”] tell application “Finder” to tell (application file id “GRRR”) to set growlHelperAppName to name

tell application growlHelperAppName to run script “register as application \”” & growlAppName & “\” all notifications {\”General\”, \”Error\”} default notifications {\”General\”, \”Error\”} icon of application \”OmniFocus.app\”” tell application growlHelperAppName to run script “notify with name \”General\” title \”” & alertTitle & “\” application name \”” & growlAppName & “\” description \”” & alertText & “\” icon of application \”OmniFocus.app\”” [/code]

Unfortunately this method no longer works when Growl is installed:
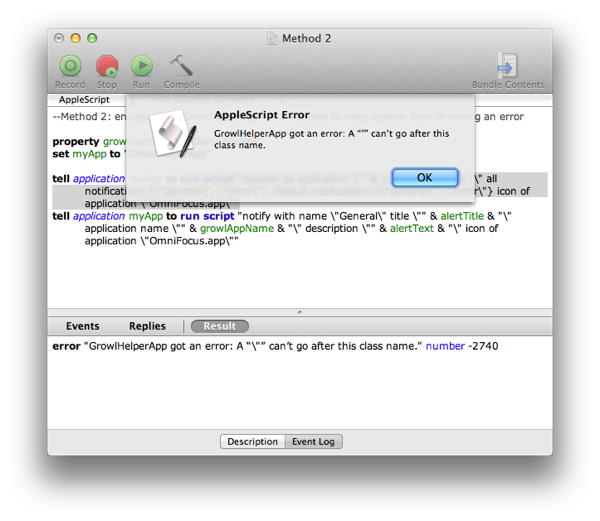
Growl Error.png

So that’s out.

Method three (bad): growlnotify

Pros: Elegant, doesn’t choke on Growl-free systems. Cons: Doesn’t work unless growlnotify is installed.

Another method is to use the growlnotify utility that ships with Growl Extras, and call it via a shell script:

[code lang=”AppleScript”] do shell script “/usr/local/bin/growlnotify OmniFocus -n ‘General’ -m ‘My message'” [/code]

But growlnotify isn’t part of the base Growl installation, so for Growl users who don’t have the tool installed, it won’t be obvious why the notification doesn’t work.

Method four (good): osaScript

Pros: Works for Growl users, doesn’t choke on Growl-free systems, uses standard AppleScript syntax. Cons: Verbose and unsightly.

The first method I found that actually works in 2011, described by elasticthreads, is to encapsulate the entire Growl-facing script as its own (perfectly quoted) string, and run that using the shell tool osascript:

[code lang=”AppleScript”] set osascript to “property growlAppName : \”Dan’s Scripts\” property allNotifications : {\”General\”, \”Error\”} property enabledNotifications : {\”General\”, \”Error\”} property iconApplication : \”OmniFocus.app\”

tell application \”GrowlHelperApp\” register as application growlAppName all notifications allNotifications default notifications enabledNotifications icon of application iconApplication notify with name \”General\” title \”Note title\” application name growlAppName description \”Note description\” end tell ” set shellScript to “osascript -e ” & quoted form of osascript & ” &> /dev/null &”

ignoring application responses do shell script shellScript end ignoring [/code]

I didn’t want to hardcode the notification parameters, and with all the quoted stringiness, extracting them required writing a method for converting an AppleScript dictionary to string form. Here’s my complete version of this method:

[code lang=”AppleScript”] property growlAppName : “Dan’s Scripts” property allNotifications : {“General”, “Error”} property enabledNotifications : {“General”, “Error”} property iconApplication : “OmniFocus.app”

set thisNotificationName to “General” set thisNotificationTitle to “Note title” set thisNotificationDescription to “Note description” tell application “Finder” to tell (application file id “GRRR”) to set growlHelperAppName to name

on dictToString(dict) set dictString to “{” repeat with i in dict if (length of dictString > 1) then set dictString to dictString & “, ” set dictString to dictString & “\”” & i & “\”” end repeat set dictString to dictString & “}” return dictString end dictToString

on notifyWithGrowl() set osascript to “property growlAppName : \”” & growlAppName & “\” property allNotifications : ” & dictToString(allNotifications) & ” property enabledNotifications : ” & dictToString(enabledNotifications) & ” property iconApplication : \”” & iconApplication & “\”

tell application \”” & growlHelperAppName & “\” register as application growlAppName all notifications allNotifications default notifications enabledNotifications icon of application iconApplication notify with name \”” & thisNotificationName & “\” title \”” & thisNotificationTitle & “\” application name growlAppName description \”” & thisNotificationDescription & “\” end tell ” set shellScript to “osascript -e ” & quoted form of osascript & ” &> /dev/null &” ignoring application responses do shell script shellScript end ignoring end notifyWithGrowl [/code]

This method doesn’t choke on Growl-free systems, uses standard (though obscured) AppleScript syntax, and works for the Growly. It’s quite a lot of code, though, and isn’t very pretty.

Method five (good): AppleScript literal syntax

Finally—hats off to Dave Nanian for this method—AppleScript has an obscure literal syntax that can be used instead of standard syntax. In brief, literal syntax is a way of describing statements in guillemet-enclosed events and classes. This is what the above code looks like in literal syntax…

[code lang=”AppleScript”] property growlAppName : “Dan’s Scripts” property allNotifications : {“General”, “Error”} property enabledNotifications : {“General”, “Error”} property iconApplication : “OmniFocus.app”

tell application “Finder” to tell (application file id “GRRR”) to set growlHelperAppName to name

on notifyWithGrowl() tell my application growlHelperAppName «event register» given «class appl»:growlAppName, «class anot»:allNotifications, «class dnot»:enabledNotifications, «class iapp»:iconApplication «event notifygr» given «class name»:”General”, «class titl»:”Notes processed”, «class appl»:growlAppName, «class desc»:”strReport” end tell end notifyWithGrowl [/code]

N.B. While literal syntax doesn’t require encapsulating the app name in a string variable, you should do this for two reasons. First, if the application name is used, the interpreter will try to find GrowlHelperApp, thus choking on Growl-free systems. Also, Script Editor will try to convert the code to normal syntax, which you don’t want if you’ve gone to the trouble of crafting this version. Note also Nanian’s warning to use tell my application, not tell application.

This method won’t choke Growl-free systems as long as you don’t run the code; make sure you include a check to see if Growl is installed before running this code.

All tedious things must come to an end

Giving Apple the benefit of the doubt, I’ll make two assumptions:

  1. It’s generally important to have access to the scripting dictionaries of applications referenced in your script.

  2. Growl is an edge case in that it’s simultaneously useful to include in a script but superfluous to the script’s execution.

But it’s a problem that people spend so much time coming up with workarounds for such a seemingly straightforward problem. If you have any other methods for dealing with the “Growl not installed” scenario, I’d love to hear them.

You can download a paste-and-go version of the code (which includes both functioning methods) here, or click here to open it in your script editor of choice3.


  1. Much of this is gleaned from discussion and examples posted at the OmniGroup and DEVONtechnologies forums. I think the current version is most similar to one from Rob Trew.

  2. In theory, you should be able to proceed without explicitly seeing if Growl is running/trying to launch if not, because calling tell application "x" will cause it to launch if it’s not already running. However, there was a time that Growl would crash frequently (I once measured one Growl crash every 7-8 activations), so checking for a successful launch was one way to ensure consistent behavior. Growl has gotten very stable, so this shouldn’t be a problem, but it’s cheap and fast to run the check so I keep it in.

  3. Hat tip to Don Southard’s handy AppleScript-encoding service, which created the “open” link.

Airfoil volume scripts

Here’s a quick & dirty script to change the volume of all attached Airfoil speakers. Rather than incrementing by a set amount, this uses a multiplier to keep the perceived change constant. It’s nicer on the ears, and gives you more nuanced control when the stereo is set to a higher volume.

property volume_multiplier : 0.8

tell application "Airfoil"
    set all_speakers to (get every speaker)
    repeat with this_speaker in all_speakers
        set curr_volume to get volume of this_speaker
        set (volume of this_speaker) to (curr_volume * volume_multiplier)
        if (volume of this_speaker) is 0 then set (volume of this_speaker) to 0.1
    end repeat
end tell

I keep two copies of this script (“Airfoil Volume Down” and “Airfoil Volume Up”) bound to ⇧F10 and ⇧F11, respectively, to match the volume keys on my keyboard.

If I ever update them, I’ll do so over on Github.

Download: Airfoil Volume Down and Airfoil Volume Up

All OmniFocus scripts updated for a “Start-based” workflow

Like many OmniFocus users, I used to plan my days using Due dates. Planning to pick up supplies a the hardware store today? Set Due Date==Today. Need to call a friend back to catch up? Set Due Date==Today.

This behavior makes sense, on one level level: just sort everything by Due date and you can see when things are planned. But every time a date isn’t met, it has to be pushed back, creating the need for most of my date-related scripts.

Worse, indiscriminate use of Due dates dilutes their value and undermines any task-planning system.

Need to pay a credit card bill today? It’s lost in the mess of other things that are artificially “due” today, and that red Due badge is no longer a respected indication that something needs to happen today.1

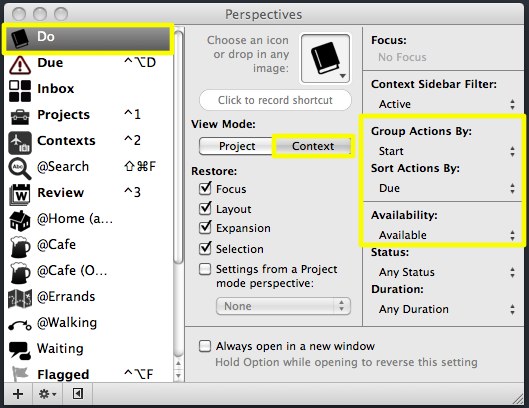
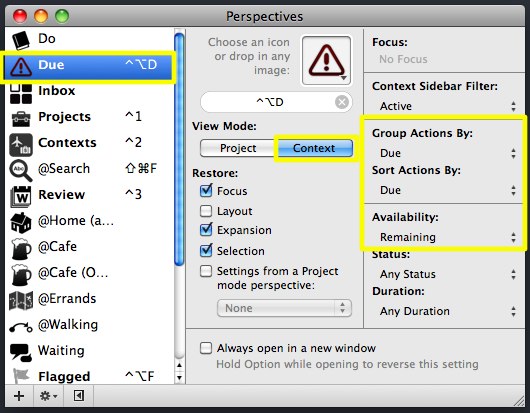
But there’s a better way.2 Just use Start Dates to plan what you think you should do, and reserve Due Dates for things that actually have to get done. (To keep this straight, I use a “Due” perspective to show what’s actually due, and a “Do” perspective to show what I’m planning to do.3)

The benefits of this approach are enormous. Things that actually need to happen don’t get lost in the shuffle, and (using time estimates) you can work with more realistic expectations of what can/should happen in a a day.

But switching to this workflow also required re-tooling my scripts, many of which focused on Due dates.

So, as of today, all my OmniFocus scripts default to a Start-based workflow. Here are some of the major changes:

  • Today, Tomorrow, and This Weekend all set the Start date of selected tasks by default.

  • In addition to pushing back due dates of tasks, Defer now has the option to act on un-timed tasks by pushing their start date back by the given number of days. (This option is on by default.)

  • All scripts now work when launched from the OmniFocus toolbar.

  • Scripts no longer fail when an OmniFocus grouping header is selected.

  • All scripts reorganized for performance and clarity.

You can continue these scripts with a Due-based workflow, of course: this is a matter of changing a single setting in each script.4 But if you’re successful with a Due-based workflow, you have much more discipline than me.

Download the lot of them here. (And as always, let me know if you have any problems with them.)


  1. Lest anyone complain of the cost of OmniFocus: I’m sure I’ve paid more money to my credit card company in day-of-due-date payment penalties than I have to the OmniGroup.

  2. Thanks to David Sparks and Benjamin Brooks for the insights that led to this realization. I mentioned this in a little more detail here.

  3. Here are the settings for my Do perspective:

    Do Perspective.jpg
    … and here are the settings for my “Due” perspective:

    Due Perspective.jpg
    Both live in my toolbar for easy access.

  4. For example, in the Defer script, there is a line: “property snoozeUnscheduledItems : true. Simply open the script in AppleScript Editor and change ”true“ to ”false" to switch this setting. If you have any problems, feel free to email me.

OmniFocus script: Get total time of selected items

2017–04–23 Update: Fixes an issue that could cause the script to fail if certain top-level perspective separators are selected.

2011–07–06 Update: If you downloaded the script before 18 July 2011, there was a bug that could cause an additional hour to be added to the time. That issue is fixed in the current version.

Total Time.png

Here’s a script to sum the total time of selected items in OmniFocus. Just select some items, fire it off and see how overcommitted you are.

Download it here.