Paste email link from selected MailMate message(s)

David Sparks posted about a clever idea to instantly link to Apple Mail messages from anywhere:

I’ve always like the way OmniFocus can create links to Apple Mail messages when saving an email as a task…

I’ve now got a script that can do that anywhere via a text expander snippet…

Once you’ve installed it, just type “elink” in any app that can take a URL and you create a link to the currently selected email message. I use it all the time in Notes and Calendar note fields but it really works anywhere.

Here’s an adaptation that works with MailMate and Keyboard Maestro:

Get email link macro

MailMate doesn’t have a ton of AppleScript support, but there is built-in Copy Links to Messages bundle command, and you can execute bundle commands via AppleScript.1

So it was just a matter of stringing together

  1. A typed keystroke trigger (I’m using elink, Spark’s shortcut of choice)
  2. MailMate’s copy command
  3. Paste

For good measure, the final action restores the prior clipboard contents.

Download on the Keyboard Maestro forum


  1. This is why I used Keyboard Maestro instead of TextExpander: TextExpander needs scripts to return a specific value for typing, but the MailMate script is run indirectly, puts the url on the clipboard, and returns empty. With Keyboard Maestro, the next step (pasting the clipboard) is trivial.

Quick entry into Asana using LaunchBar, Script Menu, etc

Here’s a quick way to get tasks into Asana using LaunchBar (my preferred method) or Script Menu. (Requires a little nerdery.)

Setup:

  1. Install the Asana Command-Line Client and set it up
  2. Download this AppleScript wrapper and update the config properties
  3. Put the script somewhere you can access it (e.g. via LaunchBar, Alfred, Script Menu, etc)

Usage (LaunchBar):

  1. Invoke LaunchBar, type your shortcut to the script and tap space
    • Enter your task title

Usage (generic):

  1. Invoke the script
    • Enter your task title in the dialog box

Notes:

  • New tasks will appear as private tasks at the top of your “My Tasks” list.
  • If you’re an Alfred user, Mannie Schumpert’s QuickTask workflow is probably better.

Log ad hoc items into OmniFocus

OmniFocus provides my daily roadmap for where I’m going. But maps can be unreliable: sometimes an emergency requires a detour … and sometimes you just pause for an unscheduled cup of coffee or phone call with a friend.

To quickly log those unanticipated events in OmniFocus – without imposing additional overhead on the system – I invoke these simple scripts from LaunchBar:

  • Log completed item to OmniFocus (CC) – saves a completed task to my work-misc project
  • Log completed item to OmniFocus (Misc) – saves a completed task to my personal-misc project
  • Log distraction to OmniFocus – saves a completed task to my distractions project

When something comes up that I’d like to log:

log-distraction

  • ⌘ space to invoke LaunchBar
  • logcc, logmisc, or dist to choose the type of entry
  • space to start typing
  • [type what it was]
  • Enter to save

Now a completed task appears in the appropriate location, and my Completed Tasks perspective gives a more accurate representation of the day.

To use it, download the script and customize the project name and context to fit your needs. Should work with Alfred as well.

Log completed item to OmniFocus

OmniFocus: Jump to a task’s project view without losing your place

2017-04-17 update: Now includes an option to focus in new tab. Thanks Marek and Kraig for the request.

TL;DR: This script opens the project of the selected task(s) in a new window (or tab).
Get it here.

It’s been a while since I last posted… so what better way to break the silence than with some new OmniFocus scripts?

I don’t think it’s controversial to say that context-based perspectives are the secret sauce of OmniFocus. Without context views, OmniFocus would be a simple outliner with quick entry and a few filters. But context perspectives let you view the exact cross-section of tasks you need to be effective.

That is, until you view a task in a context-based perspective and realize you need to see the whole project.

It should be simple to view a project’s details without losing your place in the current context view. And it was simple in OmniFocus 1: while in a context view, double-clicking a task would open its project in a new window.

OmniFocus 2 lost this feature, unfortunately. The two best options it provides are:

  • Quick Open (⌘O): allows you to type the name of a project and open it in a new window (if that option is selected). But this requires typing and the cognitive overhead of thinking about the name of the task’s project.
  • Show in Projects (⌘⌥R): brings you to the project view of the selected task. But since OmniFocus has no navigation history, there isn’t an easy way to go “back” to the original context view. It all begins to feel like a road trip:
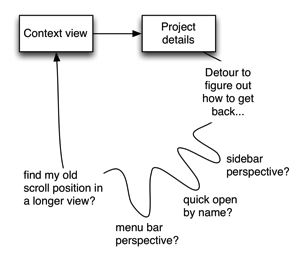
Actual path

It’s worth mentioning that Kourosh Dini presents some very useful and related workflows in his excellent Creating Flow with OmniFocus, but in my view none of these methods has the simplicity of a quick – and mindless – round-trip to the task’s project view.

So, without further ado, I present the scripts Focus in New Window and Focus in New Tab, which do the following:

  1. Given a selected task (or tasks),
  2. Opens a new Project-based window or tab, focusing on the desired project(s)

That’s it. It’s an extremely simple concept that makes this round-trip quick and painless:
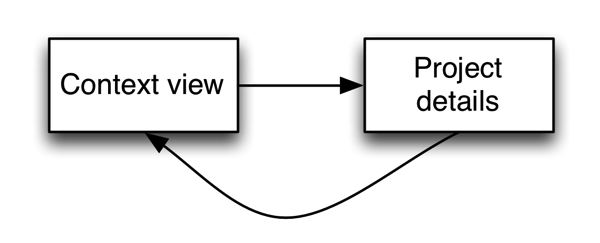
Desired path

For ease of daily use, I’ve named the script “Focus” and given it a descriptive “opens-in-new-window” icon. It now lives in my toolbar next to the real Focus action:

Focus in Toolbar

I’ve been using this countless times per day and thought it high time to share it with the world.

Get it here:

Focus in New Window/Tab on Github.

p.s. This script includes a custom icon to look better on your OmniFocus toolbar, so I’m linking to a zip file that includes this and other scripts; let me know if this is an inconvenient way to download it.

p.p.s. I’ve also updated some of the older scripts, notably Snooze and Shift (formerly called Defer). If you use them – especially if you also use LaunchBar or Alfred – you may want to take a look.

p.p.p.s. Because OmniFocus doesn’t currently (as of 2017-04-17) have native AppleScript support for managing tabs, Focus in New Tab has a few dependencies. Please check the inline notes if you run into any hiccups.

Minimize distractions with Keyboard Maestro

After Ryan Irelan posted about using Keyboard Maestro to block apps, I decided I could adapt the tip for a less cold-turkey approach to computer-enforced self control.

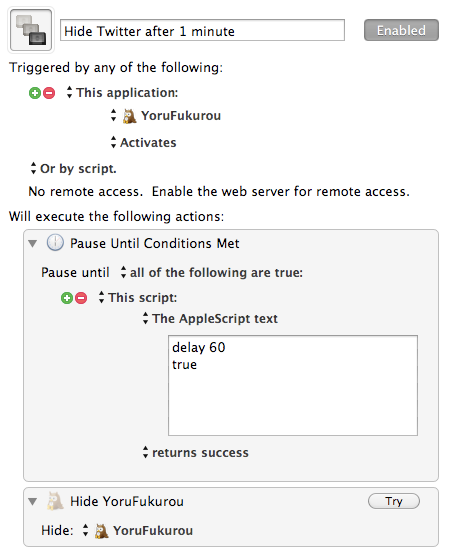
So I’ve been using Ryan’s tip with one minor change: it uses the world’s simplest AppleScript to introduce a time limit for how long distracting apps can remain open (or active). Just create a Keyboard Maestro macro like the following (or download this example):

Hide Twitter

As you can see, this macro waits one minute (60 seconds) before hiding my Twitter client. Works like a charm: hiding the app doesn’t force me to leave Twitter; but reactivating the app becomes a conscious act of will that forces me to answer That Question.

(I use a similar macro to quit my RSS reader after a more generous 10 minutes.)

All OmniFocus scripts updated for a “Start-based” workflow

Like many OmniFocus users, I used to plan my days using Due dates. Planning to pick up supplies a the hardware store today? Set Due Date==Today. Need to call a friend back to catch up? Set Due Date==Today.

This behavior makes sense, on one level level: just sort everything by Due date and you can see when things are planned. But every time a date isn’t met, it has to be pushed back, creating the need for most of my date-related scripts.

Worse, indiscriminate use of Due dates dilutes their value and undermines any task-planning system.

Need to pay a credit card bill today? It’s lost in the mess of other things that are artificially “due” today, and that red Due badge is no longer a respected indication that something needs to happen today.1

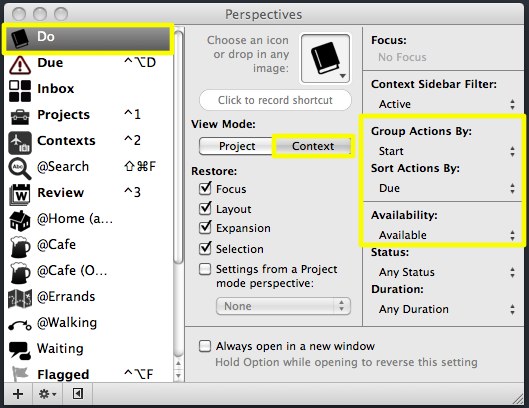
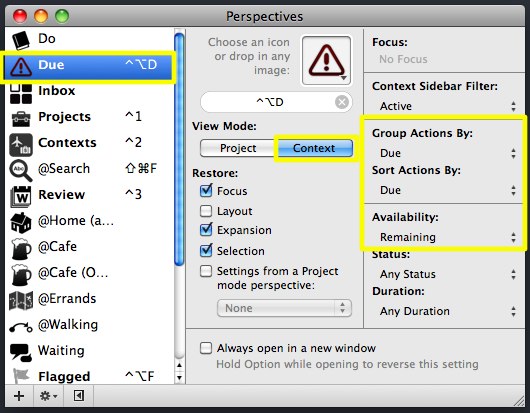
But there’s a better way.2 Just use Start Dates to plan what you think you should do, and reserve Due Dates for things that actually have to get done. (To keep this straight, I use a “Due” perspective to show what’s actually due, and a “Do” perspective to show what I’m planning to do.3)

The benefits of this approach are enormous. Things that actually need to happen don’t get lost in the shuffle, and (using time estimates) you can work with more realistic expectations of what can/should happen in a a day.

But switching to this workflow also required re-tooling my scripts, many of which focused on Due dates.

So, as of today, all my OmniFocus scripts default to a Start-based workflow. Here are some of the major changes:

  • Today, Tomorrow, and This Weekend all set the Start date of selected tasks by default.

  • In addition to pushing back due dates of tasks, Defer now has the option to act on un-timed tasks by pushing their start date back by the given number of days. (This option is on by default.)

  • All scripts now work when launched from the OmniFocus toolbar.

  • Scripts no longer fail when an OmniFocus grouping header is selected.

  • All scripts reorganized for performance and clarity.

You can continue these scripts with a Due-based workflow, of course: this is a matter of changing a single setting in each script.4 But if you’re successful with a Due-based workflow, you have much more discipline than me.

Download the lot of them here. (And as always, let me know if you have any problems with them.)


  1. Lest anyone complain of the cost of OmniFocus: I’m sure I’ve paid more money to my credit card company in day-of-due-date payment penalties than I have to the OmniGroup.

  2. Thanks to David Sparks and Benjamin Brooks for the insights that led to this realization. I mentioned this in a little more detail here.

  3. Here are the settings for my Do perspective:

    Do Perspective.jpg
    … and here are the settings for my “Due” perspective:

    Due Perspective.jpg
    Both live in my toolbar for easy access.

  4. For example, in the Defer script, there is a line: “property snoozeUnscheduledItems : true. Simply open the script in AppleScript Editor and change “true” to “false” to switch this setting. If you have any problems, feel free to email me.

Plan your day better with OmniFocus time estimates

Confession: I usually fail to accomplish what I plan for a day. When the morning begins, big plans are in place… but at the end of the day, a pile of undone tasks lingers in my OmniFocus “Do” perspective.1 More often than not, they just get snoozed for the next day’s action list.

And the process repeats.

It’s demoralizing to watch the Pile of Do grow, and I often feel out of control when looking at what seems like a reasonable list of things to accomplish in a day’s time. Clearly, good intentions need to be tempered by reasonable expectations.

Enter time estimates. Over the years I’ve been using OmniFocus, I’ve never really used its ability to assign a time estimate to projects and tasks. It seemed like a lot of effort for very little benefit: all OmniFocus really does with time estimates is sort/filter.2

But time is a critical dimension of doing: without time, there is no action. It should follow that time estimates are just as important.

So here is my new morning routine:

  1. Collect all actions I want to do today by assigning them a Start Date of today.

  2. In “Do” perspective, assign time estimates to each item.

  3. Check the total time of the day’s planned items; remove lowest priority items until my list is doable. (Use the Total time and Snooze scripts to make this step easier.)

This routine has several immediate benefits:

  1. Assigning estimates forces you to clarify next actions. In cases where it was difficult to assign a time estimate, I realized I hadn’t clarified the next action well enough. Poorly defined next action → inaction.

  2. Using estimates helps clarify what is feasible for the day. This morning, my first pass included almost 14 hours’ worth of work. Without time estimates, I wouldn’t have known how feasible this plan was.

  3. You can start right now. No need to assign estimates to everything in your OmniFocus database; just estimate what you’re looking at for today.

Having seen how simple this process is, I’m shocked I didn’t do this years ago.


  1. I keep two perspectives side-by-side in my toolbar: “Due” and “Do”. Due shows tasks sorted by due date; these are items that really truly have to get done by the given date. Do shows tasks sorted by start date; these are the items that I plan to do on a given day. This gives me the benefit of some planning flexibility without the problems that come from recklessly using due dates. For more on this method, see this David Sparks post, which inspired me to use it.

  2. While OmniFocus doesn’t do much with estimates out of the box, there are some scripts that can do things like starting timers to keep you on task. See this discussion thread for more info.

OmniFocus script: Get total time of selected items

2017-04-23 Update: Fixes an issue that could cause the script to fail if certain top-level perspective separators are selected.

2011-07-06 Update: If you downloaded the script before 18 July 2011, there was a bug that could cause an additional hour to be added to the time. That issue is fixed in the current version.

Total Time.png

Here’s a script to sum the total time of selected items in OmniFocus. Just select some items, fire it off and see how overcommitted you are.

Download it here.

Archive messages with a single keystroke in Mail.app

Aug 2011 Lion update: the script works but is quite slow in Lion (it’s zippy in Snow Leopard). I’m looking for a workaround, but this appears to be a Mail.app bug.

TL;DR version: Archive Mail messages with a single keystroke:

  1. Download this script and Fastscripts (free for up to 10 hotkeys)
  2. Move the script to ~/Library/Scripts/Applications/Mail/
  3. Set your hotkey in Fastscripts (Using a letter key is possible but not recommended. Try another character like `\/=- or an F-Key.)

The script will then move selected message(s) to a folder named “Archive”.

More information:

Existing shortcuts to file messages in Mail.app get you down to two or three keystrokes, but that just isn’t good enough for someone who has tasted the sweet, sweet bliss of single-keystroke archiving in Postbox or Gmail.

In my original reply to this superuser thread, I suggested using an AppleScript to move selected messages to an archive, and triggering the script using a single-key shortcut using Fastscripts. That script is simple and straightforward, but it has a major shortcoming: it leaves you hanging with no next message selected, so you have to manually select your next message. Not ideal.

My new script archives messages with a bit more smarts. Here’s what it does:

  • If a mailbox is in the foreground, the script moves selected messages to the folder named “Archive” and selects the next available message. Boom.

  • But you don’t want to accidentally archive messages whenever you hit your archive key. If the frontmost window isn’t a mailbox, the script will ignore the archiving functions and (optionally) type some text wherever you are. This is useful if you use a single key to trigger the script; without this function, you would never be able to type that key into a mail message because it’s intercepted by FastScripts before getting to the Compose window.

For interested scripters, here were some challenges:

  • Select next message: The solutions I found online select the next message by sequential Message ID, which usually means that it only works if your mailbox is sorted by Date Received. Using visible messages gets messages in the order in which they’re displayed. Watch out, though: if message threading is turned on, the top-level thread item is not selectable. See my workaround in the script.

  • Enter the keystroke that was captured: Merely telling System Events type the character that triggered the script will trigger the script again, resulting in a virtual infinite loop. I used a paste routine to work around this.

That’s it… happy archiving!

22 Mar 2011 update: fixed bug that caused selection to be lost when only the topmost message in a mailbox is selected.

applescripticon.gif

Download: Archive Selected Messages